

Introduction#
There are many websites that teach you how to host a blog, and on most of them you end up paying $5 each month for resources and a domain.
I wished for something different; I already had a Raspberry Pi lying around, and I wanted full control, privacy, and a free blog that doesn’t require me to pay more than the electricity it consumes.
Next, you will see how I managed to successfully build a hybrid infrastructure using a Raspberry Pi sitting in my living room and an Oracle Cloud free-tier instance.
Architecture#
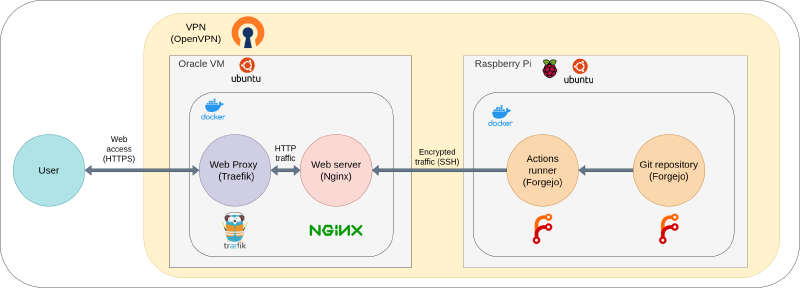
Hardware#
The infrastructure is deployed on two Ubuntu nodes (Ubuntu 24.04.5 LTS specifically). One is my Raspberry Pi 5 at home, and the other is an Oracle Cloud free-tier virtual machine (VM) running in Frankfurt.
I could have hosted this blog on just one host, but I decided to split it into two machines for three reasons:
- Resources: The free-tier instance in the cloud has limited resources available, and I thought it would be wise to split the load.
- Privacy: By hosting my website in the cloud, I am not exposing my home IP address directly to visitors.
- Learning: It’s a good learning experience to work with a hybrid infrastructure.
Platform management#
There are multiple services that need to run together on a host to be able to publish a blog, and to manage them effectively, I am launching them in containers.

Docker
Docker is containerization software that works great on Linux systems. It allows you to run lightweight containers directly on your host machine; each container can be dedicated to one service and all its dependencies. This makes setups like mine much easier to manage (update, delete, and customize services with just a few commands). Also, if done correctly, the isolation introduces an additional layer of security.

Portainer Community Edition
To further boost the potential of Docker, I am also using Portainer. The Community Edition is open-source and extremely easy to set up and learn; it integrates a ton of tools into its web interface, which makes playing around with Docker containers really fun.
The whole project sits inside Portainer as a Docker Compose file, which I update and redeploy whenever I need to change something.
Networking#
I am using a few networking concepts throughout the process of developing this blog. In this section, I will briefly go through the most important.
VPN#
A VPN connection is what allows two or more machines to communicate privately and securely over the internet. It creates a tunnel between devices, and all packets that pass through that tunnel are encrypted and accessible only to the endpoints that are connected to each other.

OpenVPN
To achieve this in my setup, I chose the open-source project OpenVPN. It’s old but gold, still standing as a go-to when it comes to security, configuration, and features.
Here is an overview of the steps that I took to make the connection work:
- I set up an OpenVPN server on the Raspberry Pi and created a client certificate for the Oracle VM.
- I opened and forwarded the port on my home router so VPN traffic could reach the host.
- On the Oracle VM, I set up the OpenVPN client and configured it to connect to the server using the generated certificate (+ firewall configurations to allow VPN traffic).
DNS#
DNS is what allows my blog to be reachable using a human-readable domain, and it’s an absolute necessity if you want your blog to be accessed by human beings. The problem is that you need to pay to own a domain.
To circumvent that, I use a subdomain steopoaie.vlad.md. This is a free subdomain I got from FreeDNS. The platform allows me to manage as many subdomains as I want for any public domain listed on the website (I found vlad.md to be a suitable domain for me). For hosting this simple blog, I only needed to add an A DNS record that points to my Oracle IP address.
Traffic Routing & TLS#
Now that my machine can be reached by normal human beings with a browser, I need to serve the files on the web.

Nginx
Nginx is usually the web server I default to when I need to serve something serious; it’s fast, reliable, lightweight, and works great with Docker.
However, hosting the blog over HTTP is not enough these days (some browsers won’t even open the website if it’s not secured). To make this website fully accessible, I needed a TLS certificate so that clients could establish a secure connection with my web server. I found that Let’s Encrypt is a nonprofit that provides free certificates, so I just needed a way to acquire them.

Traefik
Traefik is an open-source reverse proxy. I use it in my setup to manage the acquisition and renewal of TLS certificates automatically. Traefik also has a plugin ecosystem that can add some interesting features to the setup.
What I love about this service is that it integrates flawlessly with Docker and saves me so much configuration headache. In order to forward traffic from Traefik to your desired service, you only need to specify the configuration as Docker labels in your Docker Compose file, and Traefik takes care of the rest.
Here is a snippet of the Docker Compose file I am using:
services:
  # Web proxy container to manage TLS certificates
  traefik:
    image: traefik:latest
    container_name: traefik

    # expose web ports (HTTP and HTTPS)
    ports:
      - "80:80"
      - "443:443"

  # Nginx container to host my blog
  web-server:
    image: nginx:alpine
    container_name: web-server

    # Labels defined for Traefik
    labels:
      # Enable routing
      - traefik.enable=true

      - traefik.http.routers.blog.rule=Host(`steopoaie.vlad.md`)
      - traefik.http.routers.blog.entrypoints=websecure # specify Traefik gateway (defined by me)
      - traefik.http.routers.blog.tls=true # enable tls
      - traefik.http.routers.blog.tls.certresolver=letsencrypt # defined by me to use letsencrypt
      - traefik.http.services.blog.loadbalancer.server.port=80 # Nginx is serving on port 80
And it’s done; no extra configuration needed, and it works for as many services as you want. And the best part is that all routing is done through the local Docker network, which does not require me to expose any service.
The Development Pipeline#

Forgejo
Forgejo is a versioning platform that uses Git (like GitHub, but open-source and self-hosted). I chose to use it to learn more about how to manage a versioning service and also to benefit from the advantages of using Git for development. It also comes with some CI/CD functionality through Forgejo Actions.
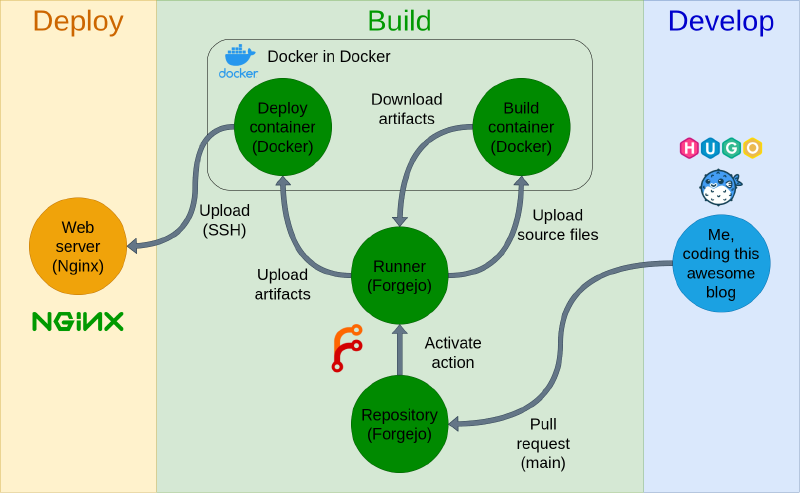
Below you can find an overview of the CI/CD pipeline behind this project.
Development#
For the development of this blog, I use Hugo with the Blowfish theme. Hugo is a great framework that allows you to build static websites easily using Markdown; this makes it a great option for a blog.
For my development flow, I use Git. I have one development branch for new features and bug fixes, and one production branch. Then, whenever I want to publish my changes, I create a pull request to merge them into the production branch; the publishing workflow is triggered automatically once the pull request is validated. The workflow has two jobs called Build and Deploy.
Build#
The Build job runs in a Docker container that has hugo preinstalled. It compiles the project and stores the raw HTML, CSS, and JS artifacts to be deployed by the next job.
Forgejo Actions are executed by a Forgejo Runner, which in my case is another Docker container running alongside the other services. A runner can spin up machines or containers to run the jobs defined in the workflow.
To allow the Forgejo Runner to create containers and run jobs within them, I needed to provide it access to my local Docker socket. This can be a messy and insecure process. A better solution is to use Docker in Docker or DinD. DinD is a Docker container with Docker installed; the Docker daemon of the container can be exposed via a TCP socket, where the Forgejo Runner can connect and launch containers.
Deploy#
The Deploy job spins up a custom Docker image, fetches the artifacts, and uploads them to the Oracle VM using rsync over ssh. The job connects using a dedicated user with limited permissions on the Oracle VM.
Below is a snippet of the workflow .yaml file I am using:
name: Build hugo project
"on":
  push:
    branches:
      - main
jobs:
  build:
    name: build
    runs-on: hugo
    defaults:
      run:
        shell: sh
    steps:
      # get repository
      - name: Checkout
        uses: actions/checkout@v6
        with:
          fetch-depth: "0"
          submodules: recursive

      - name: Running build
        run: hugo --gc --minify --environment $HUGO_ENVIRONMENT
        env:
          [ENVIRONMENT VARIABLES HERE]

      # upload artifacts for deployment
      - name: Upload artifact
        uses: actions/upload-artifact@v3
        with:
          name: hugo-site
          path: public/

  deploy:
    name: deploy
    runs-on: ubuntu-deploy # custom docker image
    needs: build
    defaults:
      run:
        shell: bash
    steps:
      - name: Download artifact # uploaded by the build job
        uses: actions/download-artifact@v3
        with:
          name: hugo-site
          path: public/

      # deployment using `ssh` and `rsync`
      - name: Deploy to VPS
        run: |
          mkdir -p ~/.ssh
          echo "$SSH_KEY" > ~/.ssh/id_deploy
          chmod 600 ~/.ssh/id_deploy
          ssh-keyscan -p 20202 -H "$SSH_HOST" >> ~/.ssh/known_hosts

          rsync -avvz --delete public/ -e "ssh -vvv -i ~/.ssh/id_deploy" "$SSH_USER@$SSH_HOST:$DEPLOY_PATH"
        env:
[ENVIRONMENT VARIABLES HERE]Security#
Fortunately for me, this blog is static, which means that I don’t have any backend service like a database or an API.
This fact alone eliminates a lot of potential attack vectors that can harm my setup, but as any system can eventually be hacked, mine can be too. Let’s see how.
Attack surface#
Since I did not write backend code, a priority for me is to protect my infrastructure and any potential entry point in my system.
At first glance, what is visible from outside is my Oracle VM, which exposes four ports:
- TCP 80 (HTTP)
- TCP 443 (HTTPS)
- VPN port (OpenVPN server for different reasons)
- SSH port
Good security practices#
System updates: Vulnerabilities appear nearly every day, so I have to make sure the code running on my host is up to date and patched. For now, I do weekly updates manually, but I plan to switch to an automated method.
Firewall: The Oracle Cloud security lists and the local iptables configuration protect my machine from unforeseen attack surface exposure. All services are unreachable by default, and rules have to be defined manually.
SSH: To avoid automated attacks, SSH does not run on the default port (22). Password authentication is disabled, and there are different users with limited permissions to reduce damage in case secrets leak by mistake.
Docker hardening#
Even on an updated system, there is a possibility that I might be late with a security patch or that the service might have a 0-day. In that case, if an attacker manages to hack one of the web services (Traefik or Nginx) and gain a reverse shell, they will find themselves in a Docker container.
Here are some steps I took to harden my Docker Compose configuration and minimize the potential damage an attacker can do:
# this is only a snippet to showcase the security options
traefik:
  image: traefik:v3
  container_name: traefik
  restart: unless-stopped
  security_opt:
    - no-new-privileges:true # prevent gaining new privileges
                             # through SUID binaries

  mem_limit: 512m # good option to limit DoS attacks
  cpus: 0.5

  cap_drop: # dropping all capabilities
    - ALL
  cap_add: # add only necessary capabilities
    - NET_BIND_SERVICE

  ports:
    - "80:80"
    - "443:443"

web-server:
  image: nginx:alpine
  container_name: web-server

  user: nginx # force the use of a non-root user
  security_opt:
    - no-new-privileges:true

  read_only: true # the container cannot write on disk
  tmpfs: # a few locations to write logs in memory
    - /var/cache/nginx:uid=101,gid=101,mode=1700
    - /var/run:uid=101,gid=101,mode=1700

  # no capabilities needed
  cap_drop:
    - ALL

  # DoS protection
  mem_limit: 512m
cpus: 0.5Conclusion#
This wraps up the overview of the setup behind this website. I am still improving and changing things as time goes on, so probably in the future things will look quite different; the only thing I hope to stay the same is the fact of not paying. Leave me a message if you see things that can be improved, security blind spots, or if you just want to know more!
AI Usage
I used AI to help with the post’s general structure and to correct grammar and spelling errors. All the content is written by me.